In this article, we are going to create a Meta Box through which you can upload multiple images in the form of a gallery and use them in your site. I created this control primarily as an alternative to the native Featured Image Meta Box in which only one Featured Image can be uploaded. I wanted multiple images in the form of a Slider to be used in place of Featured Image. It is a nice feature to have in a theme especially when the theme is a Magazine or a Portfolio one. Also, there might be plugins available out there of which I’m not aware which perform the same functionality but this article is aimed at doing it plugin-free. So, let’s begin.
First of all, we need to create the actual meta box. To achieve this purpose, add the following code to functions.php or wherever you want. I’d recommend creating a separate file and including it using require php statement.
[php]
<?php
/*
* Add a meta box
*/
add_action( ‘add_meta_boxes’, ‘mytheme_meta_box_add’, 10, 2 );
function mytheme_meta_box_add( $post_type, $post ) {
add_meta_box(‘mytheme_feat_img_slider’, // meta box ID
‘Featured Image Gallery’, // meta box title
‘mytheme_print_box’, // callback function that prints the meta box HTML
‘post’, // post type where to add it
‘side’, // priority
‘default’ ); // position
}
function mytheme_image_uploader_field( $name, $value = ” ) {
$image = ‘Upload Image’;
$button = ‘button’;
$image_size = ‘full’; // it would be better to use thumbnail size here (150×150 or so)
$display = ‘none’; // display state of the "Remove image" button
?>
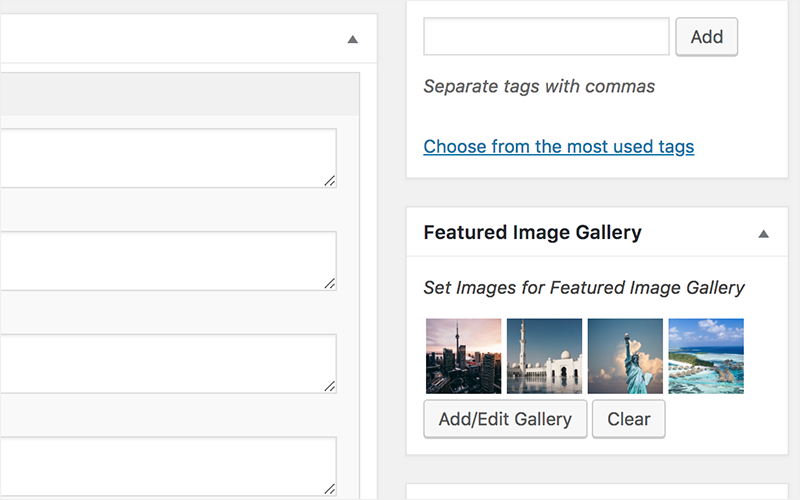
<p><?php
_e( ‘<i>Set Images for Featured Image Gallery</i>’, ‘mytheme’ );
?></p>
<label>
<div class="gallery-screenshot clearfix">
<?php
{
$ids = explode(‘,’, $value);
foreach ($ids as $attachment_id) {
$img = wp_get_attachment_image_src($attachment_id, ‘thumbnail’);
echo ‘<div class="screen-thumb"><img src="’ . esc_url($img[0]) . ‘" /></div>’;
}
}
?>
</div>
<input id="edit-gallery" class="button upload_gallery_button" type="button"
value="<?php esc_html_e(‘Add/Edit Gallery’, ‘mytheme’) ?>"/>
<input id="clear-gallery" class="button upload_gallery_button" type="button"
value="<?php esc_html_e(‘Clear’, ‘mytheme’) ?>"/>
<input type="hidden" name="<?php echo esc_attr($name); ?>" id="<?php echo esc_attr($name); ?>" class="gallery_values" value="<?php echo esc_attr($value); ?>">
</label>
<?php
}
/*
* Meta Box HTML
*/
function mytheme_print_box( $post ) {
wp_nonce_field( ‘save_feat_gallery’, ‘mytheme_feat_gallery_nonce’ );
$meta_key = ‘second_featured_img’;
echo mytheme_image_uploader_field( $meta_key, get_post_meta($post->ID, $meta_key, true) );
}
/*
* Save Meta Box data
*/
add_action(‘save_post’, ‘mytheme_img_gallery_save’);
function mytheme_img_gallery_save( $post_id ) {
if ( !isset( $_POST[‘mytheme_feat_gallery_nonce’] ) ) {
return $post_id;
}
if ( !wp_verify_nonce( $_POST[‘mytheme_feat_gallery_nonce’], ‘save_feat_gallery’) ) {
return $post_id;
}
if ( isset( $_POST[ ‘second_featured_img’ ] ) ) {
update_post_meta( $post_id, ‘second_featured_img’, esc_attr($_POST[‘second_featured_img’]) );
} else {
update_post_meta( $post_id, ‘second_featured_img’, ” );
}
}
[/php]
In the code above, 2 things are happening – the Meta Box is being created and the value of the control in the Meta Box is saved as meta data of the post.
Here, the function mytheme_meta_box_add registers the Meta Box. The ID of the Meta Box is ‘mytheme_feat_img_slider’. Note that we are registering this meta box for posts only. It can be added for pages as well.
The callback function mytheme_print_box is used to render the contents of the Meta Box. The mytheme_print_box creates a nonce for enhanced security and then echoes mytheme_image_uploader_field which contains the code for rendering the Meta Box.
In the mytheme_image_uploader_field function, basically we are setting up the Meta Box for Gallery Input.
The mytheme_img_gallery_save function saves the value of the meta box. A new meta key second_featured_img was created and this key is updated in this function after checking making the appropriate checks.
After this, you should be able to see the Meta Box in the Add/Edit Post area with an Add/Edit Gallery and a Clear Button. Currently, they will not do anything. To make them work, we need to take help of JS.
Add this code in a new JS file in the theme and save it-
[code lang=”js”]
jQuery(document).ready(function(jQuery) {
jQuery(‘.upload_gallery_button’).click(function(event){
var current_gallery = jQuery( this ).closest( ‘label’ );
if ( event.currentTarget.id === ‘clear-gallery’ ) {
//remove value from input
current_gallery.find( ‘.gallery_values’ ).val( ” ).trigger( ‘change’ );
//remove preview images
current_gallery.find( ‘.gallery-screenshot’ ).html( ” );
return;
}
// Make sure the media gallery API exists
if ( typeof wp === ‘undefined’ || !wp.media || !wp.media.gallery ) {
return;
}
event.preventDefault();
// Activate the media editor
var val = current_gallery.find( ‘.gallery_values’ ).val();
var final;
if ( !val ) {
final = ‘[ gallery ids="0" ]’;
} else {
final = ‘[ gallery ids="’ + val + ‘" ]’;
}
var frame = wp.media.gallery.edit( final );
frame.state( ‘gallery-edit’ ).on(
‘update’, function( selection ) {
//clear screenshot div so we can append new selected images
current_gallery.find( ‘.gallery-screenshot’ ).html( ” );
var element, preview_html = ”, preview_img;
var ids = selection.models.map(
function( e ) {
element = e.toJSON();
preview_img = typeof element.sizes.thumbnail !== ‘undefined’ ? element.sizes.thumbnail.url : element.url;
preview_html = "<div class=’screen-thumb’><img src=’" + preview_img + "’/></div>";
current_gallery.find( ‘.gallery-screenshot’ ).append( preview_html );
return e.id;
}
);
current_gallery.find( ‘.gallery_values’ ).val( ids.join( ‘,’ ) ).trigger( ‘change’ );
}
);
return false;
});
});
[/code]
To be honest, I found this code in some WordPress Theme and right now I don’t know which one so I have no name. I have been using this code in my projects but since WordPress Themes are GPL licensed, I don’t think it’s an issue ( Thank God! ).
In this code, we are using the Media Modal in WordPress. It is a whole new world in itself but I would recommend giving it a read. I was greatly helped with this guide.
After this file is saved, enqueue this in the admin_enqueue_scripts action hook. Let’s assume the JS is named custom-gallery.js. Add the following code to your functions.php-
[php]
function mytheme_admin_scripts() {
wp_enqueue_script( ‘mytheme-gallery-js’, get_template_directory_uri() . ‘/custom-gallery.js’, array(‘jquery’), null, true );
}
add_action( ‘admin_enqueue_scripts’,’mytheme_admin_scripts’ );
[/php]
Here, the custom-gallery.js file is enqueued in the admin_enqueue_scripts hook. This means our JS file will be running only in the Dashboard. Here I am assuming the JS file is stored directly in the theme directory and not in any sub-directory. If you have created a new folder, the relative path will change.
After enqueuing the JS file, the Add/Edit Gallery button should be functioning now. You should be able to add Images to the Gallery in the Meta Box.
Now, all that is left is showing the images at the front-end. This meta box saves the IDs of all the images in the form of a string as meta value for the key ‘second_featured_img’ separated by commas.
You can easily access this meta key in the front-end using the get_post_meta function and the string can be converted into array using the explode function to access the arrays individually or in a loop.
Here is a sample code I am using to output the images from the Meta Box-
[php]
$image_ids = get_post_meta( get_the_ID(), ‘second_featured_img’ );
if ( ! empty( $image_ids ) ) :
$image_ids = explode( ‘,’, $image_ids[0] );
foreach($image_ids as $image_id) {
$image_url = wp_get_attachment_url($image_id); ?>
<div class="featured-item">
<img src="<?php echo $image_url; ?>" />
</div>
<?php
}
endif;
[/php]
Here, the meta value is stored in a variable an exploded to convert it into an array. Then, the URL for each image is fetched in a foreach loop to output them.
Hope you were able to learn something new today. I know it was fun sharing this new found info with you guys. Let me know what you think.
Since, you have managed to come this far, do checkout other awesome WordPress Tips, Tricks and Tutorials I have shared.